link me!
CT!


Now selling at!


Stormlight on FB
oh, the places you'll go!


my PSP homes


Monday, September 7, 2015

NOTE: you MAY link to this tut. you MAY print it out for later use offline. you MAY NOT claim it as yours or take anything else from it. this tutorial is ©Ruby/Stormlight, written September 7, 2015.
Supplies needed:
-- PSP
-- main tube of choice. I am using Lady Mishka's Eva Lollipop #5, a commission tube sold at S&CO. You can purchase her here.)
-- scrap kit of choice (I used the made to match kit by Disturbed Scraps. you can get this kit here.)
-- template of choice. I'm using FB template #36 by Millie. Check out her blog for her awesome selection of FB cover templates.
-- gradient of choice. I am using Dandelion by Kris.
-- font of choice. I used Lushus.
Cover:
1. Open template, duplicate, close original and save as a new canvas. Delete the word art if using the same template.
2. Open three papers of choice. Paste in all three papers. Use the lightest paper as your background layer. Select shape 1 layer. Go to your selections menu: select all, float, defloat, invert and then select the second paper layer and hit your delete key. Repeat with paper 2 and shape 5.
3. Repeat the latter half of step 2 with shapes 3 and 4 (smaller circles) and your third paper.
4. Select shape 2 layer. Select all, float, defloat, and floodfill with your gradient.
5. Paste in your tube as top layer and apply drop shadow. Position over the large circle. Select all, float, defloat, invert and hit delete key.
6. And now time for some elements. Numbers/names apply to the scrap kit I'm using so if you're using a different one, use the elements of your choice. All elements are resized with the smart size setting. Any directions for placement of elements are optional - you can follow them or or place where preferred. Remember to apply Jazzy's basic drop shadow after each element is placed unless otherwise marked:
9 (white vine) - 75%.
26 (butterfly) - 45%.
11 (orange poppy) - 20%.
64 (clock face) - 75%. lower layer opacity to 58%.
63 (black beads) - 40%. place along shape 5 layer. use freeform tool to cut away portions to give a wrapped effect.
49 (topaz pin) - 35%.
79 (sparkle streak) - 85%. NO drop shadow.
6. Click on the border layer (layer 6) and floodfill with a dark color from your tube. In your effects menu, go to textured effects > Polished Stone and use the default setting.
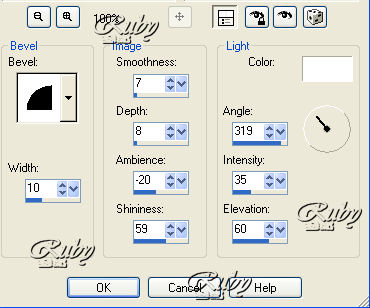
7. Create a new raster layer for your name. Use your gradient as the text color. Type your name and place it to your liking. In your effects menu, go to 3D effects > inner bevel and apply the following settings:
8. In your effects menu, go to 3D effects > drop shadow and apply the following settings: 3, 5, 90, 2.3 and color black.
9. Create a new layer for your copyright/watermark and add it on along the top. *Remember that you cannot use urls on Facebook due to their rules, so the next best alternative is to credit the artist's or store's FB page - for S&CO tubes, I put @ScrapsNCompany*
10. Delete the black square that marks the profile photo area.
1. Open a new canvas, 180x180. Copy paper of choice and paste into canvas.
2. Copy the following elements from your banner: white vine, butterfly, and black beads. Place the white vine on your background. Move the black beads to the lower left corner so that only one loop of them shows. Duplicate and mirror. Resize butterfly 40%, place on black beads.
3. Paste tube into canvas. Resize 90% and mirror, drop below black bead semi-circles.
4. Paste in sparkle streak and resize 50%. Place where preferred.
5. Create a new raster layer and floodfill with a color from your tube or kit. Click your magic wand inside the layer and go to selections > modify > contract by 4. Hit your delete key. Repeat step 6.
6. Repeat steps 7-9 from banner directions for your initial and copyright.

Subscribe to:
Post Comments
(Atom)
CU licenses


0 comments:
Post a Comment