link me!
CT!


Now selling at!


Stormlight on FB
oh, the places you'll go!


my PSP homes


Sunday, February 2, 2014

NOTE: you MAY
link to this tut. you MAY print it out for later use offline. you MAY NOT claim
it as yours or take anything else from it. this tutorial is ©Ruby/Stormlight,
written January 8, 2014.
Supplies needed:
-- PSP
-- main tube of choice (I used Ciaran by Aguila Dorado. you can purchase him at S&CO.)
-- scrap kit
"Sexy Vamp" by Designs by Joan. you can also purchase this kit here.
-- the plugin
EyeCandy 4000 (Gradient Glow).
-- Jazzy's "basic" drop shadow setting of 2, 2, 50, 3 and color black.
-- mask of choice. I used a mask by Kris.
-- font or alpha of choice. I used an alpha by Sue.
-- Jazzy's "basic" drop shadow setting of 2, 2, 50, 3 and color black.
-- mask of choice. I used a mask by Kris.
-- font or alpha of choice. I used an alpha by Sue.
1. Choose a frame
from your kit (I chose the round one), duplicate, close original.
Save this as your new file. If needed, expand canvas to 520x520.
2. Choose a paper,
drop under frame. Click your magic wand outside of the frame, selections > modify > expand > expand by 6. Return to paper layer and hit delete. Second paper, apply mask.
3. Paste tube
under frame layer. If needed, resize (I resized 60%
bicubic). Apply Jazzy's basic drop shadow. Repeat the magic wand part of step 3.
4. Time to get your element on! My list of elements refers to my kit choice, so if you're using a different kit, use whatever elements you like to fit your design. All elements are resized with the smart size setting. Remember to apply basic drop shadow after each element is placed unless otherwise stated:
86 (briar) -
right hand side
76 (white rose)
- 30%, place on briar
15 (barb wire
heart) - 50%, place below briar
36 (black
champagne) - 50%
22 (raven) -
mirror, 45%, place to sit on top branch of briar
41 (ankh) -
left hand side
5. Create a new raster layer for your name if using a font. If using an alpha, transfer your letters to the canvas. Resize
if needed, arrange them to spell out the name and merge them down into one layer.
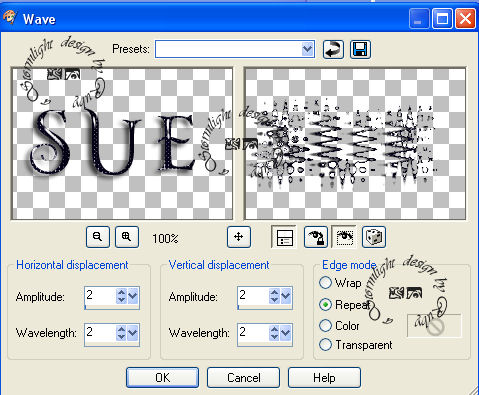
6. In your layers palette, duplicate the alpha or font layer. Switch to the first (lower) copy.
7. Go to Effects > Distortion Effects > Wave and use the following settings:
8. In your plugins menu, go to EyeCandy 4000 > Gradient Glow with the following settings:
6. In your layers palette, duplicate the alpha or font layer. Switch to the first (lower) copy.
7. Go to Effects > Distortion Effects > Wave and use the following settings:
8. In your plugins menu, go to EyeCandy 4000 > Gradient Glow with the following settings:

9.
Create new raster layer for your copyright/watermark and add it onto your tag.
Subscribe to:
Post Comments
(Atom)
CU licenses


0 comments:
Post a Comment