link me!
CT!


Now selling at!


Stormlight on FB
oh, the places you'll go!


my PSP homes


Sunday, December 8, 2013

NOTE: you MAY link to this tut. you MAY print
it out for later use offline. you MAY NOT claim it as yours or take anything
else from it. this tutorial is ©Ruby/Stormlight, originally written December 5, 2013.
Supplies needed:
-- PSP
-- main tube of choice (I used a fun tube called "F You Sky" by Pandora Creations. you can buy her over at Scraps n Company.)
-- the plugins EyeCandy 4000, MuRa Meister and Tramages.
-- Jazzy's "basic" drop shadow setting of 2, 2, 50, 3.
-- Jazzy's "basic" drop shadow setting of 2, 2, 50, 3.
-- accent of choice. I used a colored feather from a set made by tawny-carlee and shared at an msn group long ago.
-- template of choice. the template I used was made by Deb of Creative by Nature.
-- texture of choice. I used one by Aqua. you can find tons over at her blog.
-- mask of choice. I used a mask by MsKris.
-- font of choice.
-- mask of choice. I used a mask by MsKris.
-- font of choice.
1. Open the template, duplicate, close original.
2. Take your tube, paste onto
your template. Resize if needed. Place on the circle on the left. Apply Jazzy's basic drop shadow to the tube.
3. While remaining on the tube layer, click your magic wand outside copy of vector 1 (pink
circle). Hit delete button.
4. Choose your accent, resize 50%.
5. In your plugins menu, go to Mura Meister Copies and apply the "encircle" default
setting. Use raster deform to fit into
pink circle. Drop this layer under tube.
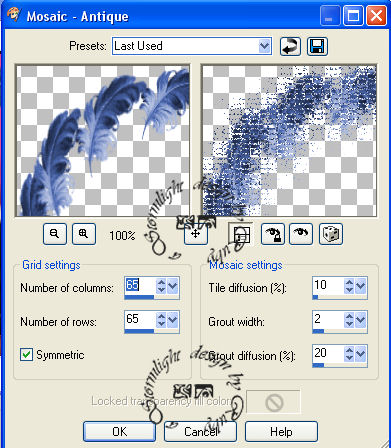
6. Go to Effects > Texture Effects > Mosaic Antique. Apply the following settings:
7. Select a color from your tube and floodfill the circle layer.
8. In your plugins menu, go to Tramages > Pool Shadow. Apply the following settings:

9. On the word art layer, go to Adjust > Hue and Saturation > Colorize with the settings 136/255. Do the same on the stars layers but change the numbers to 136/182.
10. Paste in your texture. Apply mask, merge as group. In your layers palette, send to bottom.
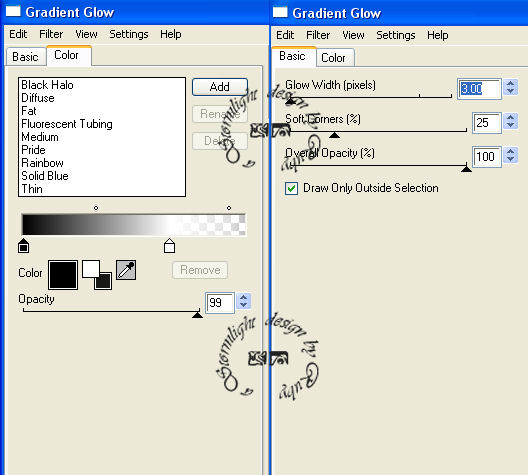
[optional] In your plugins menu, go to EyeCandy > Gradient Glow and apply the following settings but with opacity of 65% or less:

11. In your plugins menu, apply Mura Meister clouds with the default setting but change bottom color block to black (leave other two white).
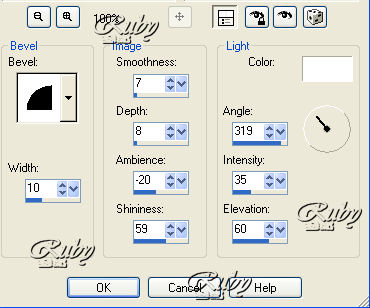
12. Create new raster layer for your name. Add your name. Under effects > 3D Effects > Inner Bevel, apply the following setting:
13. Go to EyeCandy 4000 > Gradient Glow again and apply the following settings:
14. Create new raster layer for your
copyright/watermark.
Subscribe to:
Post Comments
(Atom)
CU licenses


0 comments:
Post a Comment